Master Control User File - SET 32
This user administration program combines all of the user-related settings into one place. It combines all of the user defaults, security fields, and parameters related to any application, including web applications like IWMS, Selection Sheet Manager, and File Management.
User settings are the top level settings. They override the authority class and global settings.
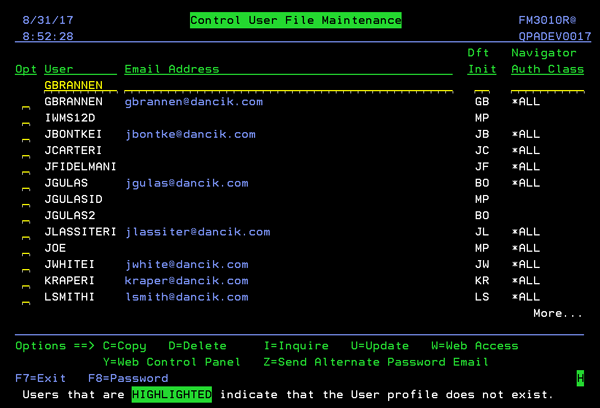
Options
| Option | Description |
| C |
This option allows you to copy all the settings from one user's control panel into an existing one or a new one. Make entries into the following fields:
|
| D | Delete a user's settings. |
| I | Inquire - View a user's settings. |
| U |
Update a user's settings. For more information, refer to Updating a Record. |
| W |
Enable or disable a user's access to web applications, and enter settings applicable to each web application. For more information, refer to W = Web Access |
| Y |
Accesses the Web Control Panel which links all work-station based control panel entries to a user of web applications. These settings are the same settings that establish operator defaults and restrictions based on the users work station ID. The difference is that these settings relate to a user ID instead of a workstation, and only affect the users use of web based applications. Essentially these settings enable user-based web applications to use restrictions and settings normally associated with a work station. For more information, refer to Y - Web Control Panel |
| Z |
Option "Z" and the alternative Email settings were developed and implemented for use with the Sales Portal. |
Updating a Record
Use this option, along with a high level password to make changes to an existing control panel.
Screen 1
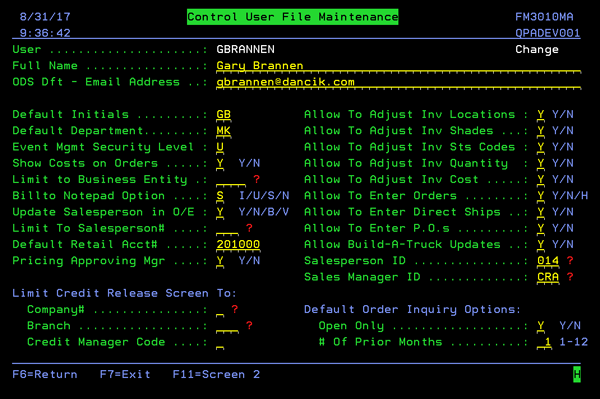
| Field | Description |
| Full Name | Enter the full name of the operator. This can help locate an operator either by scrolling through the names or by using the search field at the top of the entries. |
| Default Initials | Enter the user's initials. The system uses these initials as the default for the Order Entry initials field. If this field is left blank, the Work Station Control Panel default initials are used in Order Entry. |
| Default Department | This code is used to group each user into departments. For example, CS could indicate customer service or PU could indicate purchasing. This code is used by the Event Management System and other department oriented functions. These department codes must also be defined using the System Cross Reference Tables Maintenance Program on the System Settings Menu. |
| Event Mgmt Security Level |
This field determines the security level of the user for the use of Event Management, which includes the Quote Management system.
|
| Show Costs on Orders |
Use this parameter to establish, by user, who can view product costs in certain programs. Enter Y to allow costs to show on Order Entry. Optionally, enter N to indicate that costs or gross profit statistics should not be displayed to this user on Order Entry. This option affects the Order Entry, Order Change, Order Inquiry, and Invoice Inquiry Screens. Furthermore, prices on POs and transfers will not display while performing searches. This setting also affects Navigator customer orders and POs. If you enter an N in this field and the Cost field, the user is restricted to only running X by Y reports in customer version. |
| Limit to Business Entity |
Business Entities are groupings of companies, branches, and/or cost centers. For example, you can group all your branches in one region into a business entity. Or you can create a business entity by product such as grouping ceramic tile and wood products. Entering a Business Entity code in the Limit to Business Entity field causes that business entity code to appear in any application that has the business entity parameter. This currently includes X by Y reports. If you leave the Limit to Business Entity field blank, the user has access to all the business entity records. |
| Billto Notepad Option |
This field can be used to in addition to or instead of the Billto File passwords to control access to the Billto File Notepad. The options are as follows:
|
| Update Salesperson in O/E |
The following codes are available for this field:
|
| Limit To Salesperson# |
If a number is entered into this field, then the user is restricted to records related only to the corresponding salesperson. A record is considered to be related to a salesperson if the record itself or its related Billto file record contains that salesperson's number or related salesperson listed in the Salesperson Relationship File. This only applies to the following programs:
|
| Default Retail Acct# |
Each user can be assigned to a default customer account number to use when placing orders for retail customers. This setting works in conjunction with a Google Style customer search feature within order entry. When a search is performed and a retail customer is selected, the program checks for a Default Retail Account#, as entered in the Default Retail Acct# field. If it finds a Default Retail Account#, the program uses the selected retail customer and the Default Retail Account#. The Default Retail Account# is normally an account such as CASH RETAIL SALES. If you are granted Command Line Access, you can update other users' parameters by entering CTRLUSER XXX, where XXX is a valid user ID. |
| Pricing Approving Mgr |
Enter a "Y" to designate this person as being an Approval Manager for pricing changes in the Sales Portal. |
| Allow To Adjust Inv Locations | Enter Y or N. This field controls whether or not the user can adjust inventory locations. |
| Allow To Adjust Inv Shades | Enter Y or N. This field controls whether or not the user can adjust shades. |
| Allow To Adjust Inv Sts Codes | Enter Y or N. This field controls whether or not the user can adjust serial number status codes. |
| Allow To Adjust Inv Quantity | Enter Y or N. This field controls whether or not the user can adjust quantities. |
| Allow To Adjust Inv Cost | Enter Y or N. This field controls whether or not the user can adjust costs. |
| Allow To Enter Orders |
The following options can be set for this field:
|
| Allow To Enter Direct Ships | This option can be individually set for each user. If left blank, the option defaults to Y. |
| Allow To Enter P.O.s | This option can be individually set for each user. If left blank, the option defaults to Y. |
| Allow Build-A-Truck Updates | The Build-A-Truck Updates field designates if the user can perform updates in the Build-A-Truck Program. A Y in this field enables the full use of Build-A-Truck features. An N in this field allows you to use the Inquiry mode of Build-A-Truck, but not the Update mode. It is important to set this flag for all users since the Build-A-Truck Program can be accessed from Order Entry and several other places. |
|
Salesperson ID Sales Manager ID |
These fields, designed to work with the Sales Portal, can limit access to sales information. The Salesperson ID field is validated against the Salesperson File and the Sales Manager ID is validated against the Sales Manager File. The Limit to Salesperson#, Salesperson ID, and Sales Manager ID fields work together as follows:
How the Salesperson ID and Sales Manager ID settings work: Salesperson ID
Sales Manager ID
Both a Salesperson ID and a Sales Manager ID is entered
|
| Limit Credit Release Screen To Fields | |
|
Company# Branch Credit Manager Code |
Enter the number or code of the company, branch, or credit manager whose credit information this user may view. You can leave these fields blank to include all companies/branches/credit managers. These options pertain to the Credit Held Orders Screens. You can enter a (?) and press Enter to display the options for these fields. |
| Default Order Inquiry Options - The following two options pertain to default selection values on the Order Inquiry Screen. | |
| Open Only | Enter Y to view only open orders. Optionally, enter N to view both open and closed (invoiced or cancelled) orders. You can override this default from the Order Inquiry Screen. |
| # Of Prior Months | Enter a number between 1 and 12. This is the default number of months prior to today that should be searched by the Open Order Inquiry Program. We recommend entering a number between 1 and 4 in this field. This field controls the default date span that displays on the Order Inquiry Screen. The user can override these defaults. |
Screen 2
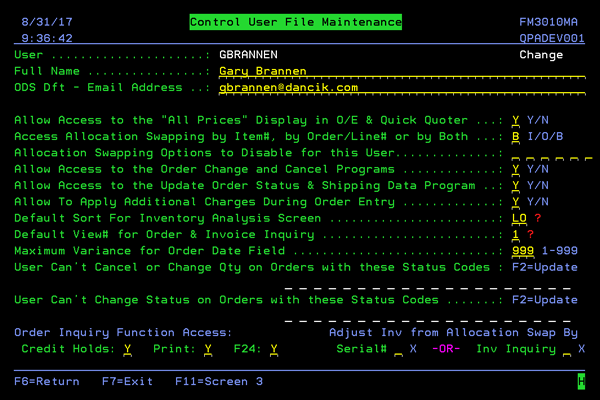
| Field | Description |
| Allow Access to the All Prices Display in O/E & Quick Quoter | Enter N in this option to disable this user's access to the All Prices display. The All Prices display is available in Order Entry and Quick Quoter and displays all available prices for an item. |
| Access Allocation Swapping by Item#, by Order/Line# or by Both |
|
| Allocation Swapping Options to Disable for this User |
This option allows you to disable all or certain Allocation Swapping options for a user. You can enter any of the above options to be disabled.
|
| Allow Access to the Order Change and Cancel Programs | If set to N the user cannot use the F6 - Change/Cancel functionality from within order inquiry, or access the Cancel/Change Orders option from various menus. The default value is Y. |
| Allow Access to the Update Order Status & Shipping Data Program | If set to N, the user cannot use the F12 - Shipping update functionality from within order inquiry, or access the Update Order Status & Shipping Data program from various menus. The default value is Y. |
| Allow To Apply Additional Charges During Order Entry |
Examples of additional charges are: carpet freight, estimating charge, installation service fee, will call service fee, and minimum order charge. Within Navigator the Additional Charges window, accessed via the Available Options drop-down menu, directs the system to search for additional charges that can be applied to the order. Additional charges can be defined in several parts of the system and can be assessed according to branch, state, marketing program, and other criteria. For example, additional charges for Fuel Surcharges can be different in each of your branches, different based upon marketing programs, customer account number, etc. If this setting is not activated, the Add to Order button does not display on the Additional Charges Window. |
| Default Sort For Inventory Analysis Screen |
The Inventory Analysis Screen Sort Code controls the way inventory records are sorted on the Inventory Analysis Screen, which is accessed in Order Entry and Order Change with an I in the selection field. Enter a ? in this field to see a list of the available sort options. This default may be changed when using the Inventory Analysis screen. This sort can be of great importance for optimizing inventory selections, especially for orders requiring multiple shades, serial numbers, rolls, and/or cuts of the same item. For example, sorts SS and WS group shades together, and then show the smallest shade groups first. Carefully review how these codes affect the Inventory Analysis screen, and then select the appropriate defaults for each user. |
| Default View# for Order & Invoice Inquiry |
The View# field controls the way the columns are displayed on the Order Inquiry review screen, the Order Inquiry by Account search, and the Invoice Inquiry screens, For example, View# 1 displays quantity and extended prices, while View# 3 displays quantity and weight. Enter a ? to see and select from a list of the available View#s. |
| Maximum Variance for Order Date Field | Enter a number between 1 and 999. This is the maximum number of days from the system date that an order date can be entered. For example, if you enter 30 in this field, then this user can only advance the Order Date (on Order Entry header screen) 30 days from today's date. In Order Entry, the default Order Date is today, which means that (unless advanced as stated here) holds are de-allocated tomorrow night, or according to the Systems Settings, Option for Removal of Unprocessed Orders, as described later in this section. This setting has no affect on orders that are processed as pick lists or invoices. |
| User Can't Cancel or Change Qty on Orders with these Status Codes |
Enter order status codes here and users will not be allowed to cancel or change the quantity on order lines that have any of these status codes. You may press F2 from the CTRLUSER screen to select from a list of status codes, and update this screen. |
| User Can't Change Status on Orders with these Status Codes |
Enter order status codes here and users will not be allowed to change the status of an order line that has any of these status codes. You may press F2 from the CTRLUSER screen to select from a list of status codes, and update this screen. |
| Order Inquiry Function Access | |
|
Credit Holds F24 |
Entering an N for Credit Holds denies the user access to the Credit Holds screen from within Order Inquiry. Entering N for Print? denies the user access to the F10 = Print function of the Order Inquiry program. Entering an N for F24 denies the user access to the F24 Additional Functions menu from within Order Entry and Order Change. |
| Adjust Inv from Allocation Swap By Serial# -OR- Inv Inquiry | Enter X beside your choice. This causes either the Adjustment by Serial# program or the Adjustments from within Inventory Inquiry program to be used when this user chooses to adjust inventory while in the allocation swapping program. If you do not enter X next to either of the options, then the user cannot adjust inventory from within the allocation swapping program. |
Screen 3
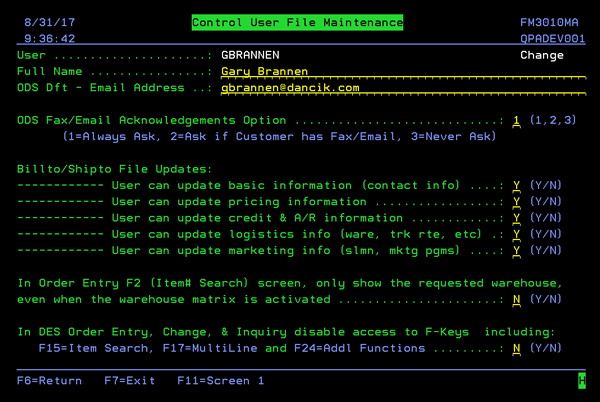
| Field | Description |
| ODS Fax/Email Acknowledgements Option |
This option controls distribution of order acknowledgements by fax or email via ODS. Option 1 (Always Ask) - Causes the Order Entry program to always display the Fax/Email screen whenever an acknowledgment is requested. Option 2 (As if Customer has Fax/Email) - Causes the Order Entry program to display the Fax/Email screen only if the customer has a valid email or fax entry in the Phone Number File, already designated for the receipt of acknowledgements. Option 3 (Never Ask) - Directs the Order Entry program to not display the Fax/Email screen. If option 1 is used, or option 2 is used, and the customer has fax/email capabilities, the Fax/Email Distribution Selections screen appears when F4 or F5 is pressed on the Order Entry Cash Register screen to print an Acknowledgment. Sending acknowledgments through ODS requires some set-up with the ODS application. For more information, refer to the Phone Numbers, and to Output Distribution System (ODS). |
| Billto/Shipto File Updates: |
These fields allow you to restrict specific users from performing certain types of updates in the Billto and Shipto files; even if they have a password. This feature enables you to allow users to update the Billto File without having to use a password, yet have each user limited to the types of information they are allowed to update. These fields can be used to deny update capabilities to the following sections of the Billto and Shipto files; regardless of the password entered.
|
| In Order Entry F2 (Item# Search) screen, only show the requested warehouse, even when the warehouse matrix is activated: |
This setting gives you control over the warehouses that appear when an F2 item search is performed on the Order Entry detail screen, and Inventory Inquiry screen. Normally, if a user's Control Panel is set to use the Warehouse Matrix, the F2 search shows all warehouses in the matrix. If this setting is activated, the F2 search only shows the current warehouse (the warehouse in the detail line warehouse field) This has the benefit of allowing more items to show for the current warehouse on a single page. |
| In DES Order Entry, Change, & Inquiry disable access to F-Keys | With this setting activated, the user cannot access navigate to other parts of the system using the F15, F17, or F24 function keys from Order Entry, Order Change and Order Inquiry. |
W = Web Access
Enable or disable a user's access to the web applications, and enter settings, through the respective function key, applicable to each application.
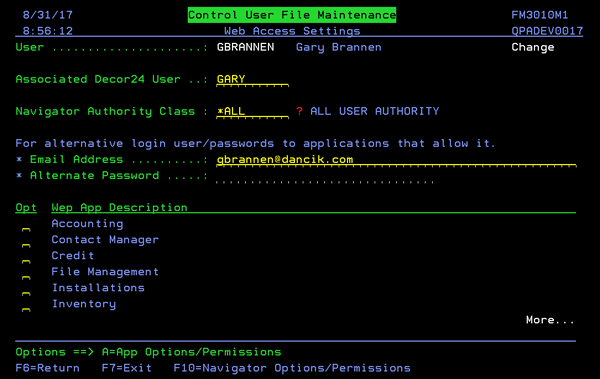
- The Associated Decor 24 User setting provides a Cross Authentication between Navigator and Decor 24. This functionality introduces the ability to move between Navigator and Decor 24 without having to re-enter a user name and password, multiple times. Enter a valid and active Decor 24 user name.
- Use the Navigator Authority Class field to assign the user to an established authority class. Authority Classes are created via menu option NAV 2.
- The settings under For alternative login user/passwords to applications that allow it allow your salespeople to log in using their email address as their user name. It provides the same security as the user name log in. At the current time, June 2015, this option only applies to the Sales Portal.
- Use the A=App Options/Parameters option to specify the access level for the features within a Navigator application. These settings are established in the same manner as the global settings.
Y - Web Control Panel
These settings are the same settings that establish operator defaults and restrictions based on the users work station ID. The difference is that these settings relate to a user ID instead of a workstation, and only affect the users use of the web based applications. Essentially these settings enable user-based web applications to use restrictions and settings normally associated with a work station.
Screen 1 - General Default and Restriction Options
Screen 2 - Order and Invoicing Options
Screen 3 - Inventory, Warehouse and Printing Options
Screen 1 - General Default and Restriction Options
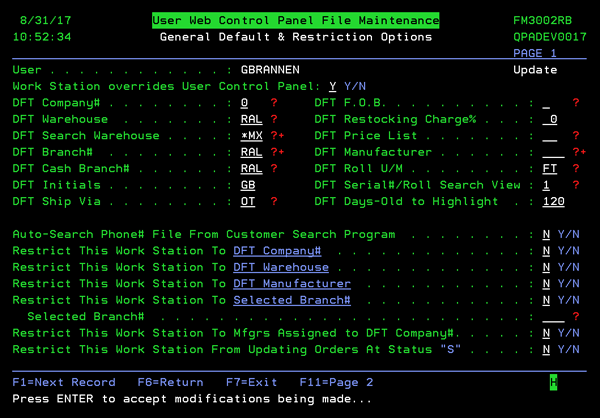
| Setting | Description |
| Work Station overrides User Control Panel | This setting directs the system to use the work station control panel settings; even if the system wide setting is active. This override feature allows you to maintain the work station settings and controls for users of specific applications and terminal devices like cut stations and RF guns, which require the settings of the workstation to take priority over the user's settings. |
| DFT Company # | The Company number this work station is most often associated with. |
| DFT Warehouse | The warehouse most often utilized by this work station. This warehouse is the default that appears on the Inventory Inquiry screen for this work station. |
| DFT Search Warehouse | Enter ALL to always see all warehouses when checking stock using the serial number display. Enter a specific warehouse to see only that warehouse, unless you specify otherwise at the time you are searching. If your default warehouse is different than your search warehouse, both are displayed. Enter *MX to display serial numbers in a warehouse sequence as specified in the Warehouse Matrix File. The Warehouse Matrix File causes the customer's warehouse to display first, followed by the warehouses as specified in the Warehouse Matrix File in the System Settings Menu. This setting primarily affects the serial number display that is included in the Order Entry, Order Change, Invoicing, and Inventory Inquiry programs. It also affects the warehouses that display on the F2 and Partial Item Number Search Screen within the programs mentioned above. |
| DFT Branch | Enter the branch code that should be credited with all orders entered at this work station. If this work station can be used for entering orders for multiple branches, either enter ALL to cause the Order Entry program to ask the user to specify a branch, or enter C* to cause the Order Entry program to always use the branch code in the Billto File record. Enter C* if you have multiple branches and centralized order entry. |
| DFT Cash Branch | Enter in a branch code to assign that branch to any order desk cash receipts recorded at this work station. This branch is used by the Order Desk Cash Reconciliation programs. |
| DFT Initials | The initials of the primary user of this work station to ensure proper credit for the orders entered here. If multiple users share this work station, leave this field blank. You can also enter default initials based on the user ID using the CTRLUSER program. |
| DFT Ship Via | Leave blank to default to the Ship Via codes entered for each customer in the Billto File. Enter a Ship Via code, such as WC for will call, if most orders entered at this work station are shipped the same way regardless of customer. Refer to the Classification Codes File for a list of valid Ship Via codes. |
| DFT F.O.B. | Leave this field blank to default to the FOB code as entered in the Billto File for each customer. Enter a code, such as W for our warehouse if most orders entered at this work station require the same FOB code. Refer to the Classification Codes File for a list of valid FOB codes. |
| DFT Restocking Charges% | Leave blank if the restocking charge percentage on returns is decided on a customer-by-customer or case-by-case basis. Enter a percentage from 01-99 (with no decimal places), if you have a set restocking charge percentage. It can be overridden in Order Entry. |
| DFT Price List | Enter the default price list to be displayed when accessing the Item Search program. If this field is left blank, code LP is assumed. |
| Dft Mfgr | Leave blank for normal use of the three-character manufacturer portion of the Item# field on Order Entry and Inventory Inquiry. Enter an actual manufacturer code if you deal primarily with the products of one manufacturer. Enter *NO if you want the cursor to skip the Manufacturer Code field and start from the color#. |
| DFT Roll U/M | If you sell rolled goods enter SY, LF, SF or FT to automatically default to either square yards, lineal fee, square feet, or feet/inches. This default is used when you leave the U/M field blank on the Order Entry screen for rolled goods. FT is the usual entry. |
| DFT Serial# Roll Search View |
This code controls the default inventory screen format for serialized items and rolled goods. You can choose from five formats. These formats do not apply to items with their own special formats, such as marble and stone slabs. You can enter a question mark (?) to display the options. |
| DFT Days-Old to Highlight |
Enter the number of days old a serial number has to be in order to have an asterisk (*) placed next to the date received on the Order Entry serial number screen. Example:NV1006* (the asterisk denotes that the item is over the Days old specified in either the Control Panel (SET 1) or the Item File (FIL 2). This setting does not apply to the serial number screen accessed via Inventory Inquiry (INV 1, F3). The asterisk (*) is used to highlight serial numbers at least this many days old. This field is overridden by the "days old" parameter in the Item File for each specific item, if that field is used. |
| Auto Search Phone# File From Customer Search Program | Enter Y, if you want the customer (Billto) Search program to search the phone number file (as well as the Billto file) when searching by phone number. This accesses the F10 screen of the Billto file. |
|
If the work station is restricted by the following fields the following programs are affected as follows:
|
|
| Restrict This Work Station to DFT Company# | Enter Y to restrict the user from seeing, entering, or updating transactions or records from other than the assigned company number. This restriction applies to all Order Desk System programs, as well as many other programs, but it does not affect all applications. Users with global system access are not restricted to this company in all programs. |
| Restrict This Work Station to DFT Warehouse | Enter Y to restrict the user from seeing, entering, or updating transactions or records involving any other than either the search or default warehouses as assigned on the first screen of the Control Panel. This field is ignored if assigned to warehouse ALL. This restriction applies to all Order Entry programs, as well as many other programs, but does not affect all applications. Users with global system access are not restricted to this company in all programs. |
| Restrict This Work Station to DFT Manufacturer |
This field is meant for order entry, order inquiry, and inventory inquiry purposes only. It is designed for users that work at outside companies (such as your suppliers) to be able to access your system but only see or create orders with their assigned manufacturer code. This manufacturer restriction does not apply to other areas of the system such as reporting, accounting, or warehouse management. Refer to the Business Entities File if you are interested in global (system-wide) restrictions to data. |
| Restrict This Work Station to Selected Branch# |
Enter Y to restrict the user from seeing, entering, or updating transactions or records involving any other than the branch you enter within this parameter. This parameter only affects certain menus and programs, such as the Order Entry System. This restriction also applies to the Order Entry Reports, and when posting cash. This functionality is useful for companies that have multiple branches that independently list and post cash. |
| Restrict This Work Station to Mfgrs Assigned to DFT Company# | Enter Y to restrict inventory access to manufacturers that have the designated company numbers in the Manufacturer File. This restriction applies to all Order Desk System Programs, as well as many other programs, but it does not affect all applications. Users with global system access are not restricted to this company in all programs. |
| Restrict This Work Station from Updating Orders At Status S | Enter Y to restrict users at this work station from changing or canceling an order/line with a status code of S (shipped). |
Screen 2 - Order and Invoicing Options
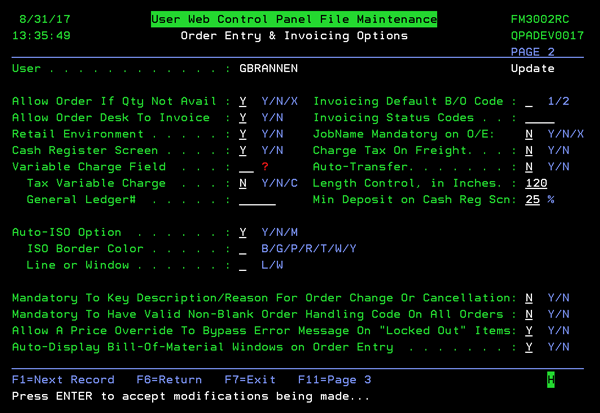
| Field | Description |
| Allow Order if Qty Not Available | Enter Y to allow the order entry operator at this work station to place orders against stock even when the message Not Enough Available is displayed. Enter N if you do not want the operator to be able to place orders against the stock when this message is displayed. Enter N if the operator is not permitted to use judgment regarding borrowing stock that is currently held or ordered by other customers. Enter X if you do not want to allow the operator to place orders exceeding the quantity available, and if you do not want serial numbers with no quantity available to appear on the order entry serial number display. Entering Y can cause inventory available figures to become negative. If you enter Y, proper management controls must be in place to ensure negative inventory is resolved by de-allocating one customer's order to service another order for the same inventory. |
| Allow Order Desk to Invoice | Enter Y if the order entry operator at this work station is allowed access to the point-of-sale (F9) invoice function. This function creates an invoice without first creating a pick list. Enter N to disable this function at this work station. |
| Retail Environment |
Enter Y to grant access to various retail features and screens. The retail environment protects and drops certain fields that are primarily applicable in a wholesale environment. It also assumes that each order has an entry in the Salesperson# field of the Order Header screen, and that the salesperson name prints on the point-of-sale invoices generated. The Retail Environment parameter only needs to be activated at the workstations that require the retail-oriented features. You can operate with some control panels having the retail environment activated and other not activated (Retail Environment = N). The retail environment option fine-tunes certain aspects of the system including the following:
|
| Cash Register Screen | Enter Y to activate the Cash Register screen. The Cash Register screen appears instead of the Print Selection Screen when an order is completed. It includes all of the print selection options, in addition to fields for the entry of cash, check, and/or credit card payments. It can display charge amounts and balance due for cash transactions. Enter Y if this work station is operating in a retail or cash counter environment. |
| Variable Charge Field | This parameter defines the variable charge field on the last screen of the Invoicing program. This field affects only the invoicing program. It specifies which of the three variable charge codes to display in addition to the Freight field, which is always available. HC causes the invoicing program to display a field for handling charges when each invoice is processed. DC causes invoicing program to display a field for delivery charges when each invoice is processed. PC causes the invoicing program to display a field for packing charges when each invoice is processed. This entry is not applicable if you are using automatic invoicing by status code. |
| Tax | Enter Y to always tax the Variable Charge field. Enter N to never tax the Variable Charge field. Enter C to tax the Variable Charge field only if the customer is taxable. |
| G/L# | Enter the general ledger account number for the Variable Charge field. |
| Invoicing Default B/O Code | Enter 1 if default is not to leave the unshipped quantity open when an item is partially shipped. Enter 2 if the default is to leave the unshipped quantity open when an item is partially shipped. Code 1 automatically cancels unshipped quantity. Code 2 leaves it open. This parameter is automatically overridden when order handling codes are used on orders and invoices. Code 1 is also referred to as Fill/Kill, because items that are not filled are canceled. Code 2 is referred to as Ship As Available, since all uninvoiced material is left open for later shipment. |
| Invoicing Status Codes | Enter the status codes that orders must have in order to be invoiced. Orders lines not at this status are not invoiced, unless these defaults are overridden at the time of invoicing. |
| Make JobName Mandatory on O/E |
Entering a job name can help in tracking orders and in reporting. This field is on the lower right-hand side of the Order Entry Header screen, and prints under the customer's purchase order number on all documents. Options
|
| Charge Tax on Freight | Enter Y to default to taxable for miscellaneous charges in Order Entry. Enter N to default to non-taxable for miscellaneous charges. This parameter affects only taxable customers and orders. It automatically enters a "=" sign at the end of the F6 line description to tax the F6 line. Set this parameter in accordance with local tax regulations. |
| Auto-Transfer? | Always enter Y if you have inter-warehouse transfers to ensure that any stock drawn from a warehouse other than the warehouse on your order header screen is transferred. We recommend always setting this field to Y. |
| Length Control, in Inches | This default is for rolled goods only, and controls which rolls display on the Roll Search based on the quantity you enter. For example, if you enter a length control of 120 inches, when you enter an order for 40 ft, the system searches for all rolls at least 40 ft less 120 inches, or 30 ft. If the length control is 0 inches and order is for 40 ft, the system starts the search at exactly 40 ft. If the length control is 999 inches and the order is for 40 ft, the system starts search at 0 ft and displays all rolls, regardless of size. We recommend that you enter a value between 60 and 999. |
| Min Deposit On Cash Reg Scrn | If you use the Cash Register screen, you can use this field to specify a minimum deposit percentage to collect for all COD or cash orders. This is primarily for goods that are shipped or picked up at a later date or for special orders. For example, entering 50 in this field causes the system to suggest a collection of 50 percent of the order total. On the Order Desk Invoicing screen, when goods are partially shipped, the program always suggests the amount to collect that will pay for all invoiced material and ensure that a 50 percent deposit remains on all back ordered non-stock material. This is a powerful tool for regulating complex, multiple shipment, or multiple payment orders. |
| Auto-ISO Option |
Enter a Y in this field to allow the system to automatically select the best stock when placing an order from this workstation. The other options are:
|
| ISO Border Color | Enter a color code in this field to control how the ISO screen border is displayed. |
| Line or Window | If you chose a color in the above field, use this field to choose whether the color border displays as a window or within a thinly lined box. |
| Mandatory To Key Description/Reason For Order Change or Cancellation | Enter Y if you require a reason for changing or cancelling each order. The reason or description is stored on the orders notepad. |
| Mandatory To Have Valid Non-Blank Order Handling Code on All Orders | This option enables you to make order handling codes a mandatory field on Order Entry and incoming EDI orders. Enter Y in this field to force this workstation to use order handling codes. Set the Control Panel used for inbound EDI orders in order to control this feature for EDI or have this setting put into any customized EDI maps. |
| Allow A Price Override To Bypass Error Message On Locked Out Items | Enter Y if you allow this work station to override the price for customers not allowed to purchase certain materials. |
| Auto-Display Bill-Of-Material Windows on Order Entry | Enter Y if you want to auto-display the Bill-Of-Materials screen. Enter N if you do not want to auto-display the Bill-of-Materials screen. In general, users entering orders while on the phone with customers should set this field to Y, whereas users placing orders from faxes should set this field to N. |
Screen 3 - Inventory, Warehouse and Printing Options
Establishing Printer Overrides
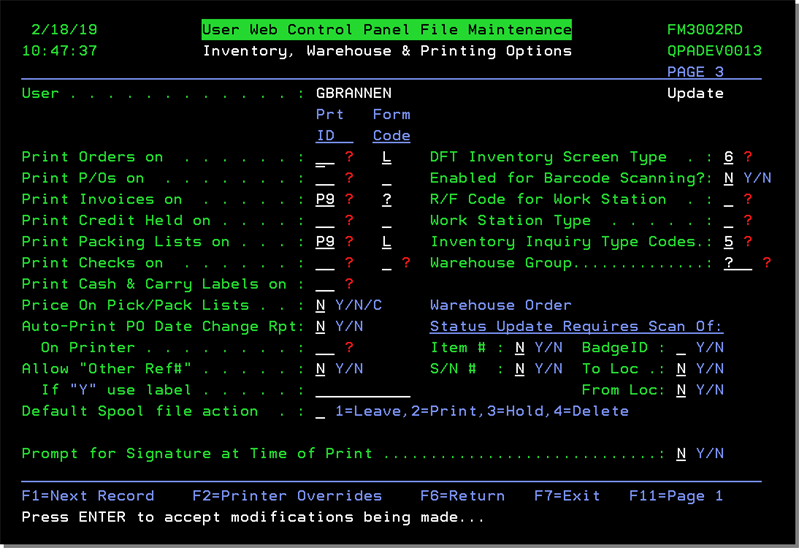
| Field | Description |
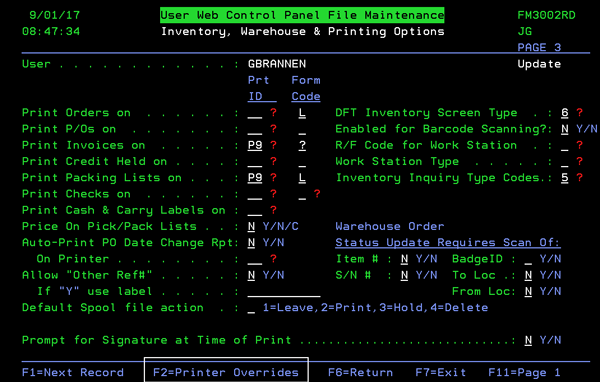
| Print Orders on |
Enter the printer ID on which customer orders should print. This controls order acknowledgements, quotations, and point-of-sale invoices only. Pick lists and other warehouse documents are usually controlled in the Warehouse File program. Pick lists print only on the printer designated here if no pick list printer is designated in the Warehouse File. This setting also controls the printing of Direct POs Direct POs can be printed from the following locations:
Prior to 2011 direct PO printer settings were made via menu option SET 36 - Maintain Pick List Printer Format. |
| Print P/Os on | Specify the printer ID for purchase orders. |
| Print Invoices on | The printer ID here is used for regular batch invoices. Point-of-sale invoices (via F9), print on the printer specified in the Print Orders option. |
| Print Credit Held on | The printer ID entered here is used for printing an acknowledgement of a credit held order when orders are automatically diverted to a credit hold. You should ensure this printer is in the credit department. Enter XX if you do not have a printer in the credit department, or if your credit department works with the credit screens and does not require a printed acknowledgement that an order is on credit hold. |
| Print Packing Lists on | Enter the printer ID for the printer on which you want the packing lists to print. Packing lists are a print option in the Warehouse Shipping Reports Program. They print on the same form as picking lists and are very similar to picking lists. This option pertains to packing lists that are generated using the Warehouse Shipping Reports option, as well as to individual packing lists printed via the F10 print option in Order Inquiry. |
| Print Checks on |
Enter the printer ID if you want to print checks on a specified printer. If this field is blank, checks print to your default system printer. Enter a "?" in the Form Codes setting to access a listing of all the available check formats. The listing of check codes that appears when "?" is entered comes from the FormsCode table in the System Tables Maintenance program (Set 29). |
| Form Code |
This code is used to indicate special print instructions. Some of the available codes are:
|
| Print Cash & Carry Labels on | The setting sets a default printer for cash and carry labels. This feature allows a customer to buy inventory in a retail setting (such as items stored behind a counter) and carry it out instead of having to go through the warehouse. A label is printed at the counter to show that the customer has paid for the material. As soon as the order is processed, the system directs a label to be generated. These cash and carry labels automatically bypass the pick label pool. |
| Price on Pick/Pack Lists | This parameter controls whether or not prices print on pick and packing lists. If you enter C in this field, a unit price prints for each line of a COD or cash order. Enter Y to always print a unit price on every pick list. Enter N to never print the unit price on the pick list. Note that COD and cash pick lists always show the total amount of the order, regardless of the settings in this field. |
| Auto-Print PO Date Change Report | Enter Y if you want a report of back orders affected by changes in ship dates on purchase orders, when changes are keyed using the Update Shipping Data program. Also specify the ID of the printer on which you want to print this report. |
| Default Spool file action |
The system, including Navigator, use the Output Distribution System (ODS) to distribute documents. This setting includes the following settings for a default spool file setting.
Prior to this setting being added, in 2014, the ODS Spool file default was Leave as is. With the Leave as is option, the document goes into the ODS spool file where it can be accessed and printed, held or deleted. |
| Allow Other Ref# If "Y" use Label | This setting activates the F11 function on the Update Order Status application (WAR 5). This functionality allows an operator to enter cross reference information such as fabrication numbers or operator names too help track inventory through production. |
| DFT Inventory Screen Type |
Leave blank unless you want one of the special Inventory Screen type codes to be used as a default each time you access the Inventory Inquiry program. Enter a ? in the TP (type) field in Inventory Inquiry for a list of type codes and their meaning. |
| Enabled for BarCode Scanning? | Enter Y if a bar code scanner is attached to this work station. |
| R/F Code for Work Station | This code is used to identify the terminal as an RF device. RF indicates hand-held radio frequency devices. This code also specifies the type of RF terminal needed for programs to format screens correctly. Enter Y to identify the terminal as RF. |
| Work Station Type |
Enter the work station type in order to define what the work station is used for. For example, if the type is C, it a cutting work station located near a cutting machine, on which orders are updated to the cut (X) status. This feature also allows the cutting station operator to override the default printer selection and choose a different printer. This can reduce the time it takes to retrieve labels, and gives you flexibility in printing labels. Another work station option is V - Vehicle Mounted RF (Wide screen). This workstation type is meant for vehicle mounted RF units in a warehouse environment. The wide screen mode displays system directed picking information (i.e. the next 10 picks) in addition to the normal RF menu. This workstation type is intended to work with the Build-A-Pallet application with the Integrated Warehouse Management System (IWMS). To access a list of all the available work station types, enter a ? in the field and press Enter. |
| Inventory Inquiry Type Codes |
This setting applies to the Navigator Order Management application. It allows you to select the display format on the Navigator Order Management Inventory Inquiry window. When option 5 (Show in other Reference # Format) is selected, the "Other Ref#" column displays after "UM" and "Date Received" is pushed to the last column. |
| Prompt for Signature at Time of Print |
This option allows the system to interact with a third party application to capture a customer signature's on the following documents related to order entry:
If this setting is activated, an F17 key on the order entry cash register screen allows for the printing of digital signatures. This functionality is controlled by a license key. Without this key, you will not see the option in the control panel or on the print option screens. |
| Warehouse Order Status Update Requires Scan of: | Enter Y beside each field that you require bar code scanner to scan, when scanning bar code pick or ship labels. The answers to this question require knowledge of the bar code labels and warehouse functions that you will use. These parameters are used by the Order Status Update program on the Warehouse Functions Menu. |
Establishing Printer Overrides
The F2=Printer Overrides function, on the third screen of the Workstation Control Panel, allows you to establish printer overrides. This provides users flexibility in setting their own printer override criteria that will not be overridden with each release or patch. For example, if you have one tray on a specific printer set up to print invoices, you can use this feature to ensure it doesn't get overridden when the system gets updated.
Form (such as Invoices, Bill of Ladings) printing defaults are established by Kerridge. In most cases, these defaults are left blank so if form defaults are not set via a control panel the defaults will be used.
- The F2 - Printer Override function is located at the bottom of the third screen of Control Panel Settings.
- Pressing F2 exposes the following screen.
- Choose the type of document you want to set overrides for. A limited set of laser documents are available for these new settings. Enter a U in the appropriate Opt column and press Enter. The first, of three, printer override screen settings appears.
- Press F11 to display the second page of settings. Although this screen contains several settings, we recommend that unless your application is unique you keep the defaults for all of them except the ones circled below.
- *NO - The spooled output file is not held on the output queue. The spooled output is available to a spooling writer based on the Spooled output schedule prompt (SCHEDULE parameter) value.
- *YES - The spooled output file is held until it is released by the Release Spooled File (RLSSPLF) command.
- *NO - The spooled file data is not kept (saved) on the output queue after it is produced.
- *YES - The spooled file data is kept on the output queue until the file is deleted. After the file is produced, the number of copies is set to 1, and the status of the file is changed from WTR to SAV.
- Press F11 to proceed to screen three.
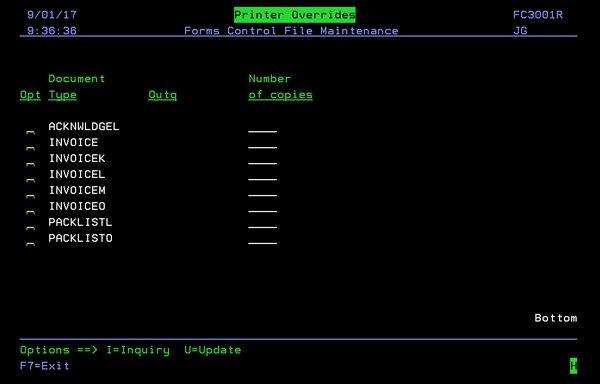
Some fields on each of the screens are system supplied and cannot be updated. The remaining input capable fields can be updated. However, it is the recommendation that only fields circled or highlighted be updated.
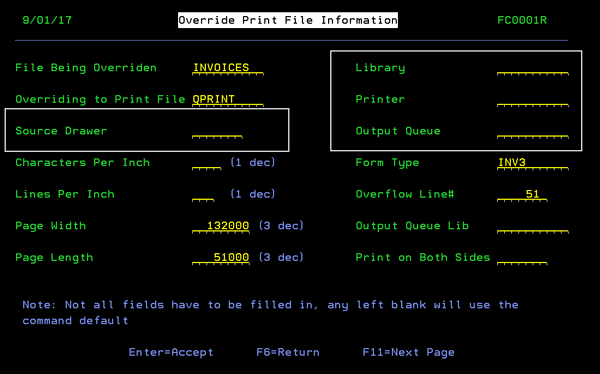
| Setting | Description |
| Library | Specify the library where the file is located. |
| Printer | The printer where you want to send these forms. You might want to consider making this a dedicated printer. For example, if you are setting this workstation up to print invoices the printer assigned here should be dedicated to running only invoices. |
| Output Queue |
Sends the forms to a spool file where they can stored to be printed later possibly by night jobs. If you change the output queue on this screen, it changes your printer ID on the work station control panel. |
| Source Drawer | Allows you to designate a drawer on the printer for special use. This allows you to keep it loaded with your invoice or BOL forms. Valid values range from 1 through 255. |
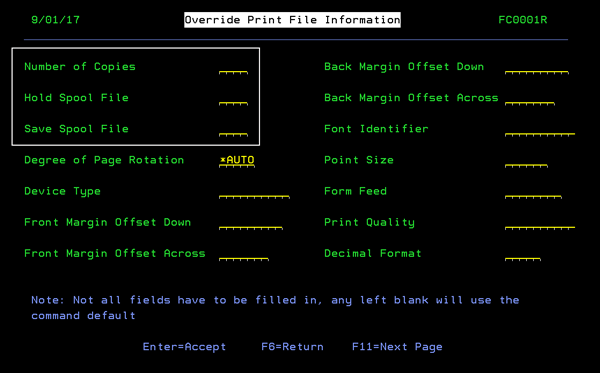
| Setting | Description |
| Number of Copies | Specify the number of copies of each form you want to print every time you submit a print job. |
| Hold Spool File |
Specifies, for spooled output files only, whether the spooled file is held. The spooled file can be released by using the Release Spooled File (RLSSPLF) command. The following values are allowed: |
| Save Spool File |
Specifies, for spooled output only, whether the spooled file is saved after the output is produced. This parameter overrides the save value specified in the printer file or in other called OVRPRTF commands. The possible values are: |
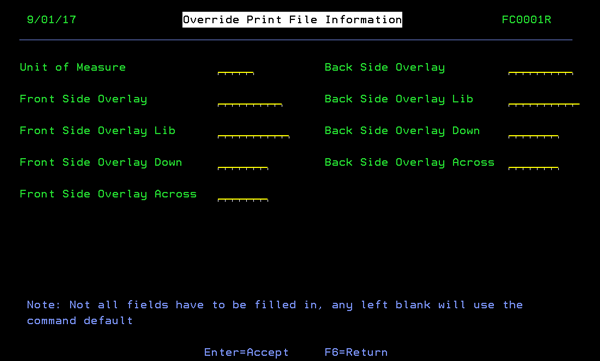
Although this screen contains several settings, we recommend that unless your application is unique you keep the defaults (leave the fields blank) for all of them.
For detailed information on any of the settings contained on the three override screens, enter the command OVRPRTF, then press F1.
